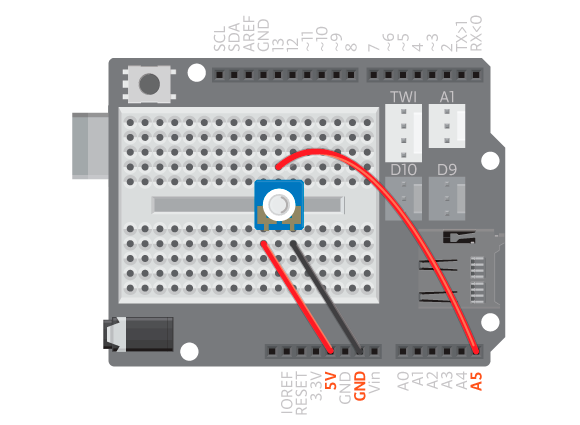
A potentiometer is a knob that you can turn to control something, e.g., the volume controller on your stereo is a potentiometer. When the two outer pins of potentiometer are connected to GND and 5V respectively, you can use the knob to control how much voltage is applied to the middle pin – the range being 0V to 5V.

Materials

- 1 Arduino Uno board
- 1 Education Shield
- 1 potentiometer
- 3 jumper wires
Instructions

- Attach the shield onto the top of the Arduino board.
- Connect the potentiometer to the breadboard.
- Connect the single potentiometer pin to analog pin A5, and the other two to 5V and GND using jumper wires.
- Upload example ‘knob’.
Code
Find the code in Example>EducationShield>Help>Knob
You should now open the serial monitor and twist the potentiometer. The reading to the left should show values between 0 and 1023, the reading to the right should show values between 0 and 10.
Commands
Knob(analogPin)– creates the knob object.- Parameters
-
(
int)analogPin– the analog pin to which the knob is connected.
-
- Parameters
setLevels(levels)– maps the sensor value to certain amount of levels.- Parameters
-
(
int)levels– number of levels the sensor is mapped into.
-
- Parameters
getLevel()– returns the level of the sensor.- Return
- (
int) – current level of the sensor. From 0 to the value set insetLevels().
- (
- Return
Troubleshooting
- Make sure everything is connected correctly.
- Make sure you have connected the potentiometer to the same pin as you have stated in your code.