In this section you will play a little bit with sound. Sound is vibrations. The sound from a guitar for example comes from the vibrations of the strings. With Arduino, you can also produce sound by generating vibrations. In the following experiment you will do this with a piezoelectric buzzer (piezo speaker), making it beep.
The Piezo Speaker
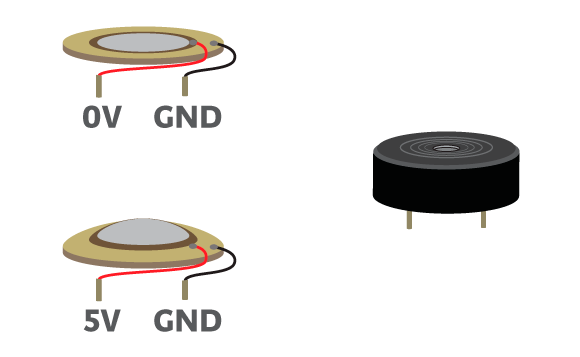
The piezo speaker is an electronic component made from a combination of two discs of different materials. One is metallic while the other is generally ceramic and both have piezoelectric properties. When a voltage is applied to these materials, they repel and produce an audible click. Removing the voltage difference, the materials will return to their original position causing another click.
Example 2.4
In this example, you will connect a piezo speaker to the Arduino, and use the Blink code from previous examples, to make the piezo click.
Materials
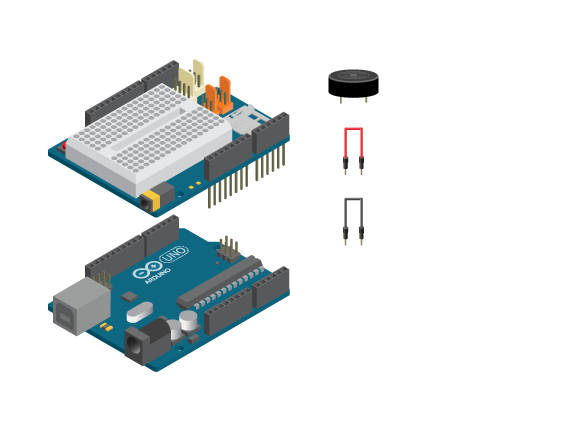
- 1 Arduino Uno board
- 1 Education Shield
- 1 piezo speaker
- 2 jumper wires
Instructions
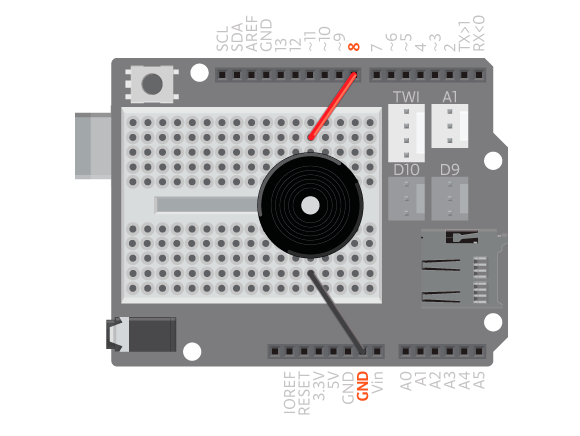
- Attach the shield onto the top of the Arduino board.
- Connect the piezo across the breadboard gap.
- Connect one leg to digital pin 8 (it does not matter which one) and the other one to GND, using jumper wires.
- Upload the following code:
Result
The piezo should now make an audible click every second.
How it works
- The variable
speakerPinis declared to hold the value 8, the number of the digital pin you are using. - In
setup(), pin 8 is configured as anoutput. - In
loop(), by writingHIGHto pin 8, the material inside the piezo repel creating a clicking sound. - The program pauses for 1 second.
- By writing
LOWto pin 8, the material inside the piezo goes back to the normal position creating another click. - The program pauses for another second.
loop()continues to loop.
Example 2.5
To be able to hear a tone, instead of clicks, you need to make the material oscillate quicker. In this example, you will reduce the delay time to 1 millisecond.
Instructions
- Upload the following code:
Result
The piezo should now make a buzzing sound.
How it works
- In
loop(), by writingHIGHto pin 8, the material inside the piezo repel. - The program pauses for 1 millisecond.
- By writing
LOWto digital pin 8, the material inside the piezo goes back to the normal position. - The program pauses for another millisecond.
loop()continues to loop.
This time the material inside the piezo is oscillating with a 2 millisecond interval. It is too fast for you to distinguish a click. Instead it is vibrating and therefore making a buzzing sound.
Tones
Now you know that you generate sound with an Arduino and a piezo by fluctuating the pin between ’0 ‘and ’1′ a certain amount of times per second. That amount is called frequency. You get different tones depending on the value of the frequency. High frequency, that is many oscillations per second gives you a high pitch tone while a low frequency, few oscillations per second gives you a low pitch tone.
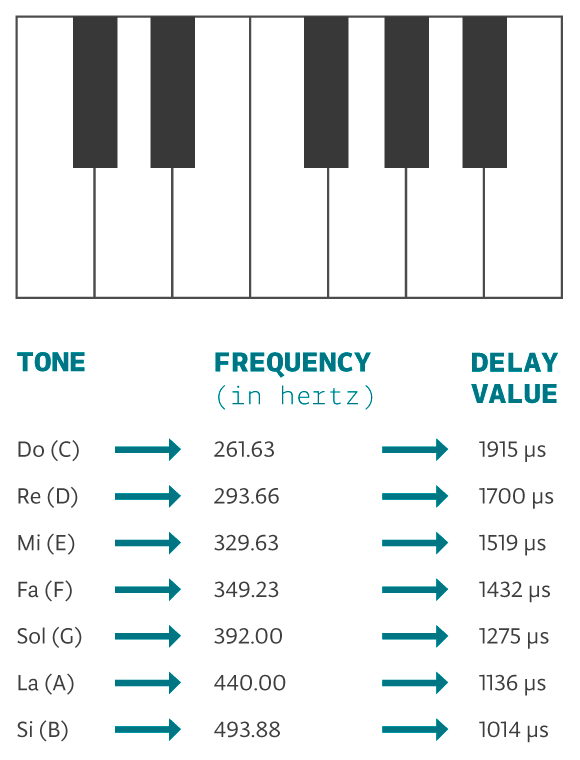
The tones have names: Do (C), Re (D), Mi (E), Fa (F), So (G), La (A), Ti (B). Of these tones Do (C) has the lowest frequency of 262 herz while Ti (B) has the highest of 494 herz. This means that you need to make the pin oscillate 262 times per second to play Do (C) and 494 times per second to play Ti (B).
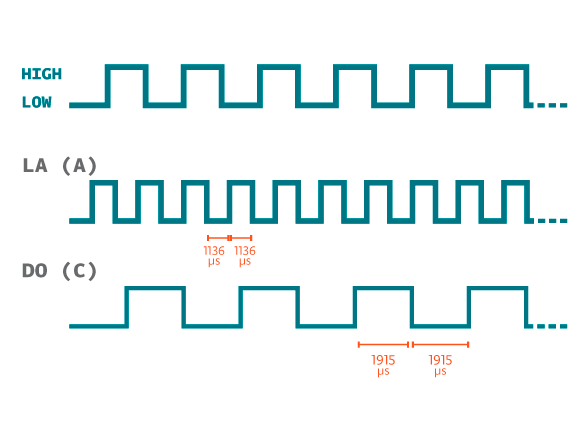
If you want to play different tones, you have to change the amount of time that the pin is HIGH and LOW so that it corresponds with the tones frequency. You do this by changing the value in the delay(1) function. There are a couple of problems: delay() does not allow you to control the time as precisely as needed, and it causes the program to pause which could be a problem if you want the program to execute other things while playing a tone.
Instead, there is a function called tone() that takes two or three parameters. The first is the digital pin to which the piezo is connected. The second is the frequency of the tone. The function calculates the delay time depending on the frequency and oscillates the digital pin between HIGH and LOW in parallel with other tasks, without delaying the program. The third optional parameter is the duration of the tone in milliseconds.
Example 2.6
This example, you will use the tone() function to generate a A with a frequency of 440 hertz.
Instructions
- Upload the following code:
Result
The piezo should now play an A for 1 second and then a C for 2 seconds.
New commands
tone(pinNumber, frequency, duration): plays a tone on a speaker connected to digital pinpinNumber, wherefrequencyis the frequency of the tone, anddurationthe duration in milliseconds.
How it works
- In
setup(), a tone is played on digital pin 8 with a frequency of 440 hertz. The tone lasts for 1000 milliseconds. - The program pauses for 1000 milliseconds while the tone keeps playing.
- A tone is played on digital pin 8 with a frequency on 261 hertz for 2000 milliseconds.
- If you want your piezo speaker to have different tones, just exchange the value ‘440’ for other frequency values listed in the table above.
Melodies
A melody is a combination of several notes. Writing a melody for a piezo would take forever if you would use the same method as in the previous examples. Instead of having to calculate the delay time depending on the frequency and decide how many times to oscillate a pin depending on the duration of the note, there is a function in the EducationShield library called play(). Read all about how to use it to play melodies here.
Learn by doing
- Write a melody using
tone(). - Write a melody using the
play()function in the EducationShield library.