An LDR is an analog sensor that reads the intensity of light. Connected to an Arduino analog pin, its values range, in theory, from 0 to 1023 depending on the amount of light shining on it. Practically the value will never go down to 0 or up to 1023 and the range will depend on the lighting conditions in the location.
Material

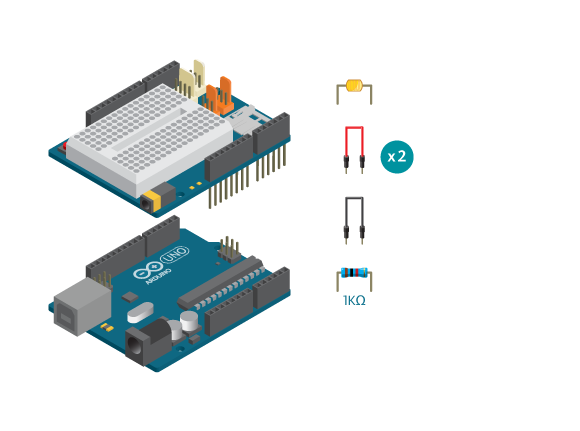
- 1 Arduino Uno board
- 1 Education shield
- 1 LDR
- 1 10k ohm resistor
- 3 jumper wires
Instructions

- Attach the shield onto the top of the Arduino board.
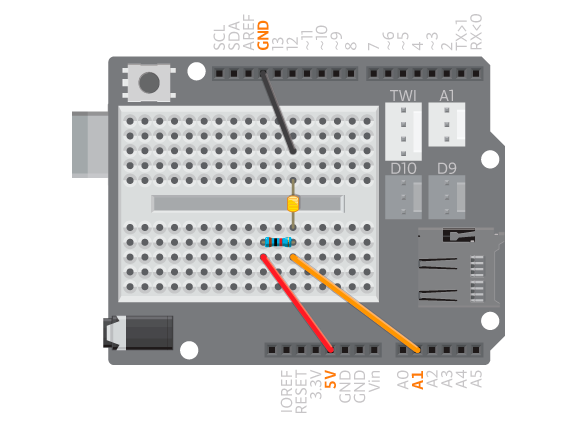
- Connect the LDR across the breadboard gap.
- Connect one leg to GND using a black jumper wire.
- Connect the other leg to a 10K resistor and to A1 using a jumper wire.
- Connect the other leg of the resistor to 5V using a red jumper wire.
- Connect the board to the computer and upload example ‘LDRTest’.
Read the Values
Code
Find the code in Example>EducationShield>Help>LDRTest
You should now cover the LDR with your hand and see how the values change in the serial monitor. When the LDR is covered you should see values closer to 0, when exposed to light you should see values closer to 1000. These values will differ depending on the lighting conditions on your location.
Commands
LDR( analogPin )– creates an LDR object.- Parameters
-
(
int)analogPin: the analog pin to which the LDR is connected.
-
- Parameters
test()– prints the sensor reading to the serial monitor.
Switch
Because the reading of LDR is heavily influenced by the environment, you should calibrate it before using. If the LDR is used as a button, or using the getState() function, you need to get two values from the LDR. The base value of LDR when nothing is covering/shining on it, and threshold. To get the threshold, you should first put the desired object/light on LDR, which gives you the top value. And the threshold is a value picked by you, between base value and top value. The closer to base value, the more sensitive your LDR switch is, but more likely to get false clicks as well.
Code
Find the code in Example>EducationShield>Help>LDR.
You should now open the serial monitor and follow the printed instructions by covering the LDR with your hand. Each time you execute an instruction the serial monitor should print ‘1’.
Commands
LDR( analogPin )– creates an LDR object.- Parameters
-
(
int)analogPin– the analog pin to which the LDR is connected.
-
- Parameters
config(baseValue, threshold )– configures the base and threshold values when the LDR is to be used as a switch.- Parameters
- (
int)baseValue: the default value the sensor gives. -
(
int)threshold– the value that is the threshold for triggering a ‘press’.
- (
pressed( timeout )– checks if the sensor is pressed.- Parameters
- (
int)timeout– milliseconds within which the sensor should be pressed. Default is 0.
- (
- Return
-
(
boolean) returns 1 if pressed within time, otherwise 0. Iftimeoutis not used, the program pauses here until the sensor is pressed.
-
- Parameters
released( timeout)– checks if the sensor is released.- Parameters
- (
int)timeout– milliseconds within which the sensor should be released. Default is 0.
- (
- Return
-
(
boolean) – returns 1 if the sensor is released within time, otherwise 0. If timeout is not used, the program waits here until the sensor is released.
-
- Parameters
getState()– checks if sensor is pressed or released.- Return
- (
boolean) – returns 1 when the sensor is pressed, 0 when it is not pressed.
- (
- Return
Troubleshooting
- First of all make sure the connections between the wires, sensor and board are correct.
- Make sure your sensor is connected to the same analog pin as you have stated in your code.
- Parameters