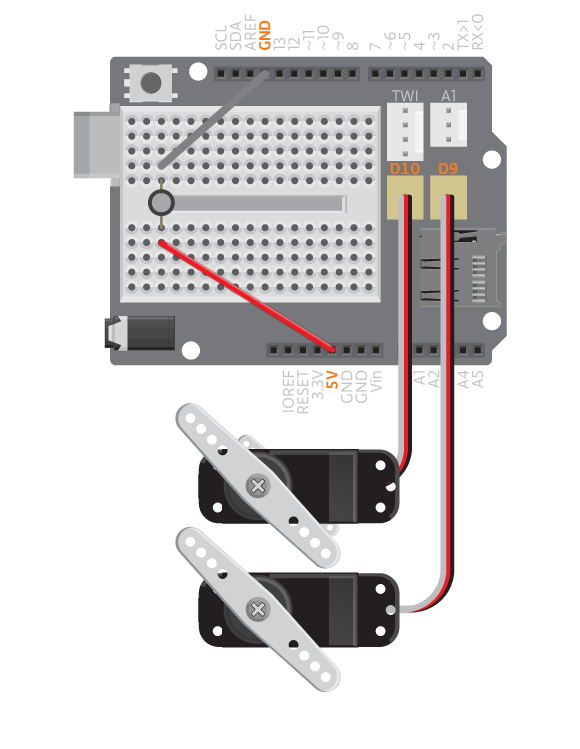
Building robots that move on two wheels is quite common. For this you need two continuous rotation servos. This can be troublesome because when making sudden turns they draw more current than the Arduino can handle. Therefore, you need to use a capacitor and when the wheels change direction, it needs to be done gradually. The second part is included in the library so that you do not have to think about that.
Materials

- 1 Arduino Uno board
- 1 Education shield
- 2 Continuous rotation servos
- 1 100 µF Capacitor
- 2 jumper wires
Instructions

- Attach the shield onto the top of the Arduino board.
- Connect the servo of the left wheel to D10 and the servo of the right wheel to D9.
- Connect a capacitor between GND and 5V, short leg to GND and long leg to 5V.
- Connect the board to the computer and upload example ‘Wheels’.
Code
Find the code in File>Examples>EducationShield>Help>Wheels
The wheels should now rotate, switching directions every other second.
Commands
Wheels( leftServoPin, rightServoPin)– creates a Wheel object..- Parameters
- (
int)leftServoPin– digital pin to which the left servo is connected. Defaults to 10. -
(
int)rightServoPin- digital pin to which the right servo is connected. Defaults to 9.
- (
- Parameters
-
begin()– initializes the servo wheels. Must be called insetup() -
goForward()- makes both servos spin forward. -
goBackwards()- makes both servos spin backwards. -
turnLeft()- makes both servos spin in opposite directions so that the vehicle turns left. -
turnRight()- makes both servos spin in opposite directions so that the vehicle turns right. standStill()- makes both servos stop.
Övriga kommandon
follow( direction )– controls the servos to make the vehicle follow a direction. Use together with the IRArray functionreadLine().- Parameters
- (
int)direction- the direction that the vehicle should follow. Can be a value from -100 to 100.
- (
- Parameters
Troubleshooting
- Make sure that the servos are connected to the pins you have stated in the code.
- Make sure that the first digital pin stated in begin(left, right) is where the left wheel is connected and the second one the right wheel. If you get this wrong your robot will go backwards when it is supposed to go forward etc.