Just as you can read analog signals, you can also write analog signals. Arduino uses Pulse Width Modulation (or PWM) pins to write analog signals. Check out the digital pins with a tilde symbol (~) next to them.
When using a normal digital pin to write HIGH or LOW, it outputs 5V or 0V. These PWM pins have a different ability – you can use them to write a voltage level anywhere between 5V and 0. With this, you can gradually dim an LED between fully on and fully off.
To use this special ability of PWM pins, you will need to use the function of analogWrite(). It takes two parameters – the number of the PWM pin and the level of output. Level of output is a number between 0 and 255. 0 is equivalent to digital LOW and 255 is equivalent to digital HIGH. You can set the level of output to any number in between.
analogRead() and analogWrite(). analogRead() reads a value between 0 and 1023, while analogWrite() writes a value between 0 and 255. analogRead() uses analog in pins, whereas analogWrite() uses PWM digital pins.Example 3.2
In this example, you will gradually change the light intensity of an LED, connected to a PWM pin.
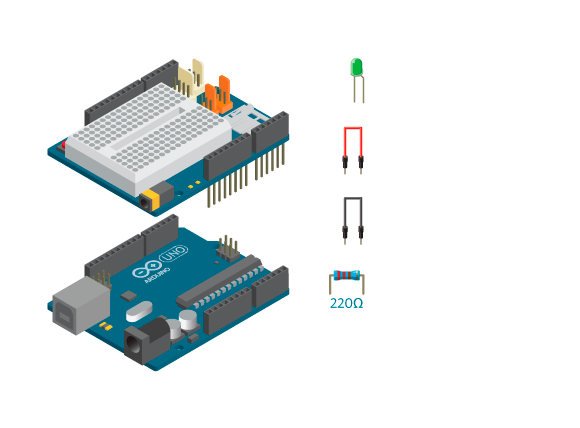
Materials

- 1 Arduino Uno board
- 1 Education Shield
- 1 LED
- 1 220 ohm resistor
- 2 jumper wires
Instructions

- Attach the shield onto the top of the Arduino board.
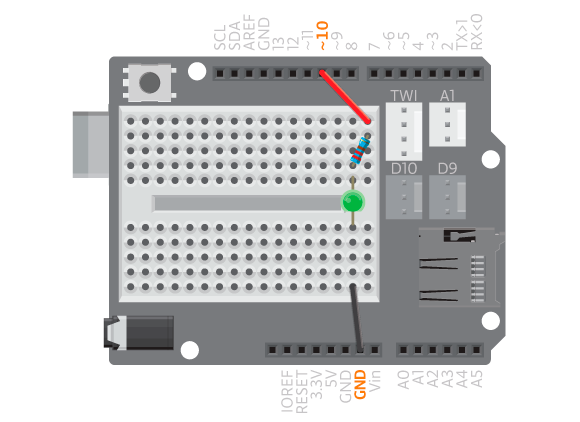
- Connect the LED across the breadboard gap.
- Connect a 220 ohm resistor to digital pin 10 using a jumper wire. Connect the resistor to the long leg of the LED.
- Connect the short leg of the LED to GND using a jumper wire.
- Upload the following code:
Result
The LED should now gradually light up to full brightness, turn off, and then repeat.
New commands
analogWrite(pinNumber, fadeLevel): writes an analog value,fadeLevel, to the PWM pin,pinNumber.fadeLevelcan be a value between 0 and 255.- You do not need to call
pinMode()insetup().
How it works
- The variable
ledPinis declared to hold the value 10, the number of the PWM pin to which the LED is connected. - The variable
fadeis declared to hold the value 0. This variable will be used to set the light intensity of the LED. - Nothing is done in
setup(). - In
loop(), an analog value is written to pin 10. The first timeloop()runs that value is 0 (fade=0), which is the same as turning the LED off. - The program pauses for 10 milliseconds.
fadeis increased with 10.fadeis checked to be more than 255.- The first time
loop()runs, fade is not more than 255 so the program jumps to the beginning ofloop()again. - A new analog value is written to pin 10. This time, that value is 10 (
fade = 10), making the LED light up with very low intensity. - The program pauses for 10 milliseconds.
fadeis again increased with 10 making it equal to 20.fadeis still not more than 255 so the program jumps to the beginning ofloop().- The 26th time
loop()runs, fade equals to 250 so the LED is turned on to almost full light intensity. - When
fadeis increased with 10 again it will be equal to 260. - When the if statement runs this time,
fadeis more than 255 so this timefadeis assigned the value 0 again. loop()continues to loop.
Learn by doing
- Make the LED fade back out after it reaches full brightness, instead of turning off. This is called a breath light.
- Change the speed of “breathing” so that it fades faster/slower.
- Use a potentiometer to control the LED. Remember the difference between
analogRead()andanalogWrite().