As you have learned previously, digital signals only have two opposite states: 1 or 0. For example, if you push a button, its state changes from one to the other; an LED is either on or off.
The real world is not digital. Water for example is not just hot or cold, it can be lukewarm. To be able to measure that, and other things in the real world, digital signals can not be used. Instead, you must use analog signals.
Instead of 2 opposite states, analog signals have continuous levels. If you use a light sensor, you can get many different values telling you how much light there is in the room, instead of a simple dark/bright. A thermometer will tell you the temperature in number, instead of cold/hot.
With Arduino, you can get analog values from the analog pins. You can see a group of pins on your board marked as ANALOG IN, which are numbered from A0 to A5. Instead of reading just 0V or 5V, these pins let you read 1024 values in between. 0V has a reading of 0; 2.5V has a reading of 512; and 5V has a reading of 1023.
To further explain analog signals, you will need an introduction to the potentiometer. A potentiometer is a knob that you can turn to control something, e.g., the volume controller on your stereo is a potentiometer. When the two outer pins of potentiometer are connected to GND and 5V respectively, you can use the knob to control how much voltage is applied to the middle pin – the range being 0V to 5V.

Example 3.1
In this example, you will use a potentiometer to control the blinking speed of the on-board LED.
Materials

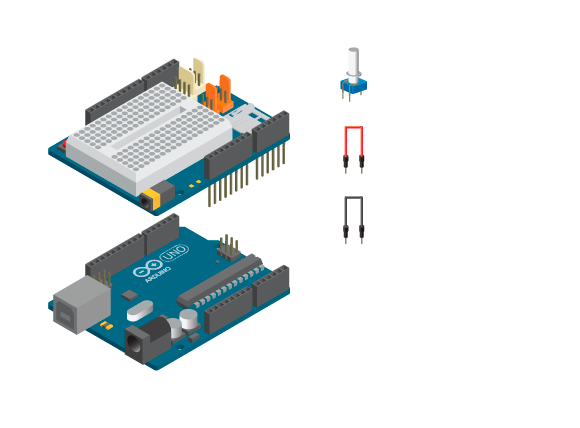
- 1 Arduino Uno board
- 1 Education Shield
- 1 potentiometer
- 3 jumper wires
Instructions

- Attach the shield onto the top of the Arduino board.
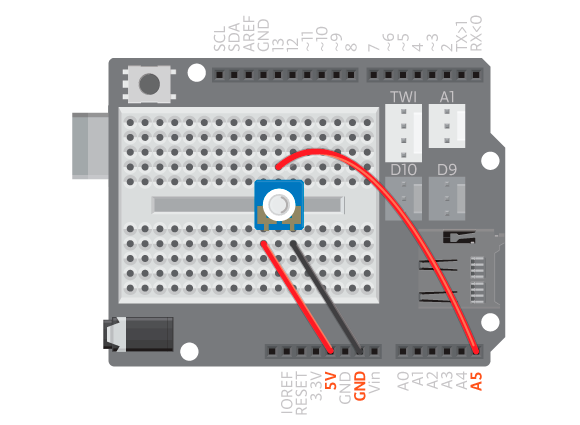
- Connect the potentiometer to the breadboard.
- Connect the single potentiometer pin to analog pin A5, and the other two to 5V and GND using jumper wires.
- Upload the following code:
Result
You should now turn the potentiometer to see the effects. When turned all the way in one direction, the LED should be on all the time. When turning the potentiometer in the opposite direction, the LED should be blinking slower and slower.
New commands
analogRead( pinNumber): reads the analog value on the analog pinpinNumber. Returns a value between 0 and 1023.- The analog pins can only be used as inputs so there is no need to use
pinMode()insetup().
How it works
- The variable
ledPinis declared. - In
setup(), pin 13 is configured as an output. - In
loop()the variablevalis declared to hold the read analog value on pin A5. - The on-board LED is turned on.
- The program pauses for as many milliseconds as the value of
val. - The on-board LED is turned off.
- The program pauses again for as many milliseconds as the value of
val. loop()continues to run, which means that analog value on pin A5 is checked continuously.
Learn by doing
- Use an if statement to make the potentiometer act as a switch. If the read analog value is over a certain value, turn on the LED. If the read analog value is below a certain value, turn off the LED.
- Use the potentiometer to generate sound with a piezo. Let the the read analog value set the frequency of a tone.