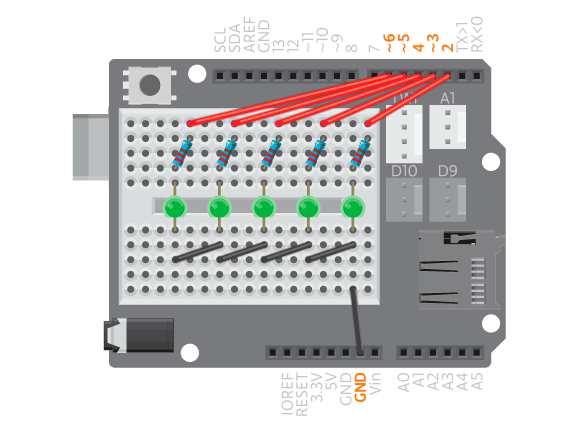
A VU-meter is a line with several LEDs. This example will explain how to connect them together and how to control them with the EducationShield library. You can use as many LEDs as you want, as long as Arduino has enough digital pins. In this example you will use 5 LEDs.
When several LEDs are connected together, since all of the short legs are to be connected to GND, they can all be connected together. But to be able to control each of the LEDs you have to connect the long legs separately to a digital pin.
Materials

- 1 Arduino Uno board
- 1 Basic Education shield
- 5 LEDs
- 5 220 ohm resistors
- 5 black jumper wires
- 5 colored jumper wire
Instructions

- Attach the shield onto the top of the Arduino board.
- Connect five LEDs across the breadboard gap.
- Connect a 220 ohm resistor to digital pin 2.
- Connect the resistor to the long leg of the first LED.
- Connect each of the digital pins 3 through 6 to a corresponding LED following the same method
- Connect the short leg of the LEDs to an Arduino GND pin using black jumper wires.
- Connect the board to the computer and upload example vuMeter.
Code
Find the code in Example>EducationShield>Help>vuMeter
All LEDs should turn on for 3 seconds. The LEDs should then go through a series of blink sequences. See below for details.
Commands
-
VUMeter– creates a VUMeter object. config( length, pins)– configures the VUmeter. Must be called insetup().-
Parameters
- (
int)length– The amount of LEDs the vu-meter contains. -
(
int)pins: Array of the digital pin numbers to which the LEDs are connected.
- (
-
-
begin()– initializes the the VU-meter. Must be called insetup(). -
clear()– turns all LEDs off. on( index )– turns one LED on.- Parameters
-
(
int)index– the array index number of the LED you want to turn on.
-
- Parameters
off( index )– turns one LED off.- Parameters
-
(
int)index: the array index number of the LED you want to turn on.
-
- Parameters
scrollRight( speed, startIndex )-turns on one LED at a time from left to right- Parameters
- (
int)speed– how long each LED is turned on, in milliseconds. -
(
int)startIndex– the array index of the first LED to be turned on.
- (
- Parameters
scrollLeft(speed, startIndex )– turns on one LED at a time from right to left- Parameters
- (
int)speed: how long each LED is turned on, in milliseconds. -
(
int)startIndex– the array index of the first LED to be turned on.
- (
- Parameters
blink( index, speed, times )– blinks one LED.- Parameters
- (
int)index: array index of the LED to blink. - (
int)speed: how fast the LED will blink, in milliseconds. -
(
int)times: times you want the LED to blink.
- (
- Parameters
blinkAll( speed, times )– blinks all LEDs.- Parameters
- (
int)speed– how fast the LEDs will blink, in milliseconds. -
(
int)times– times you want the LEDs to blink.
- (
- Parameters
fillFrom( startIndex, stopIndex )– turns on LEDs from startIndex to stopIndex.- Parameters
- (
int)startIndex– array index of the first LED to be turned on. -
(
int)stopIndex– array index of the last LED to be turned on.
- (
- Parameters
fill( length )– turns LEDs on from the first to length.- Parameters
-
(
int)length– the amount of LEDs to be turned on.
-
- Parameters
Troubleshooting
- If not all of the LEDs light up, make sure jumper wires, LEDs and resistors are connected to the breadboard correctly. See the breadboard reference if you are not sure how it works. Connecting components that are not supposed to be connected to the same breadboard line will make them short circuit.
- Make sure you have connected the LEDs to the same pins as stated in your code.
- Make sure the short legs of the LEDs are connected to GND and not the other way around.